To start out, you will need to figure out how big you want to make the dropcloth. For me, ease is a necessary factor, since I do not consider myself the best seamstress. I suggest either using the width of the material as a basis, or double the width. The length should equal the width in order to have the square, so if you double the width, you would use two 45"x90" or 60"x120" rectangles sewn together. Consider how many people you would like to be able to stand on this during blessings and such. I figured on about 10-12 people, so I made our cloth about 85inches square. Of course, there is nothing that says it cannot be a rectangle, so figure your deminsions as needed for the shape you wish. On top of this square is a wheel with the runes around the circle.
For our color scheme I used red for the square, black for the wheel and spokes, and white for the innermost circle. Of course, the runes, which run along the circle part of the wheel, are red. I have also thought of using a blue or dark green, brown and white for a more Odhinic or Vanic cloth. You can use whatever colors you want, but we like to stick with the fire, void and ice concept.
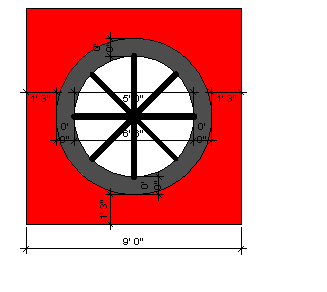
For the measurements, I have come up with several different dimensions. The easiest, I think, is a smaller version than I have made, using a 60"x60" red square, 42" black circle with 20" spokes, and a 20" white circle. This would leave 9" between the outside of the wheel and the edge of the square, an 11" band for the circle, and 9" runes (with and inch of black to spare on either side). Please do not forget to add a bit for seam allowance! Or be willing to loose a little of the dimensions, after sewing the seams. I did not sew all of mine...I used the handy invention Heat'nBond, which I ironed on to fuse the pieces of the wheel together. The problem with this is that it makes the bonded pieces stiffer, something to consider. Ours is still foldable, but again, it is stiffer.
Once you decide on the dimensions, it's time to pick the material and get started. I used Wrinklease, because it is sturdier than something like broadcloth, but still soft enough to enjoy touching, even if with the soles of our feet. It is 100% cotton, so I must remember that when washing it in the future. Of course, always prewash your material, too.
I like to start with the hardest part, so I made the wheel part first. I was crazy enough to make the wheel and spokes one piece. I did this by first folding the black material in quarters. I used my measuring tape with a pin in the end of it at the inner-most point of the material and used the "string and pencil method" to mark the outer edge of the circle. A white sewing pencil is best to use on the dark material. I cut out the outer edge of the circle, then I folded the quarter circle again into a 1/8 circle. I then made the mark for the inner edge of the circle, using the same method. I measured half the width of the spokes and marked this on the straight edges of the pie shape using a ruler, making sure all edges of the material were lined up perfectly. Then I cut out the triangle-like shape (which is the shape left on the inside of the marks for the spokes and the inner edge of the 11" partial circle). Make sense? I used the "string and pencil method" to make the white circle, too, but since the edge of the white is covered by the black, a perfect shape isn't necessary. Our wheel is 58" in diameter with 2 1/2" wide spokes and our white circle is 38" (originally 60", 3", 40" respectively).
Iron the Heat'nBond onto any material you need or wish before cutting. It only takes a few seconds to adhere the glue to the material. Then cut out the shapes.
Next I started on the red square. I sewed the rectangles together up the middle, and the outer edge. I only folded it over one time, because I was adding batting and a back to the dropcloth, as well - an idea I got from our good friend Jewel Hoffman in San Antonio. Once the square is completed, I ironed the white circle onto the center of the red square. Then, I ironed the black wheel onto the white and red pieces.
I did the same for the back as I did for the red square, and sewed the batting to the back along the edges. I hand-sewed the batting to the back with a knot every foot or so, too, to help it stay more secure. I put the bottom side of the red and the batting side together, folded the red over the dark grey back (ideally I wanted red for the back, but I found this very sturdy material on sale in dark grey), and sewed the top/front and bottom/back together. It's almost like a blanket now. In fact, I've used it as one a few times now!
The last part is adding the runes. I ironed Heat'nBond to the wrong/back side of some red material, drew the runes backwards, cut them out, and used FrayChec to keep the edges looking nice. Lastly, I ironed them onto the black circle in the appropriate order. Spacing the runes was challenging. Some are so big compared to others (such as Dagaz vs. Isa), so think about how you want yours to be arranged and draw the size that will work best for you. I made our 9" tall.
Ty and I made a second cloth recently as a gift. For this one we simply used FrayChec around the edges of the wheel and then sewed the black to the white circle, then sewed this to a red rectangle. Another option (which I will try next) is to sew bias tape along the edges of the wheel. As we make more, we will find the nicest and easiest way to complete the rune cloth, and I will update the instructions here.
I enjoy sewing and creating things from cloth, when I get the chance. And I think this is a nice project that can add something special to one's ceremonies. Good luck! And good crafting!
Dimensions subject to change, of course!
![]()